Just a small talk through on how a clip becomes part of a short film. I wanted to share this little bit of film amking, as with this clip (along with a lot of others), what you film is not necessarily what ends up as the final version on the big screen. Unfortunately, due to 'youtube quality', the colour corrections do not come out too great in this one...
Or watch the vid by clicking this line!
Showing posts with label post. Show all posts
Showing posts with label post. Show all posts
Thursday, 27 August 2009

Thursday, 6 August 2009
Adventures in the TV set.
NTSC. Mmm. Looks like I have to deal with it as part of my distribution strategy. Hmm...
Friday, 3 July 2009
DVD Authoring
Managed to get an MPEG-2, now onto the DVD suite, as this one requires an actual proper authoring. Should prove interesting...
Friday, 27 February 2009
Post Production Blues or How to 'up' the DPI of your stills from 72 to 300
I am peeved off.
As a director, there are certain things I despise. One of them is a simple solution to a seemingly complex problem.
Note the following:

This is a sample of the rules I have to follow to enter a film festival. A seemingly simple proposition. To make sure my JPEG's have a resolution of 300 DPI. So I lift a few stills directly from the timeline of my editing suite.
And now I have this problem:
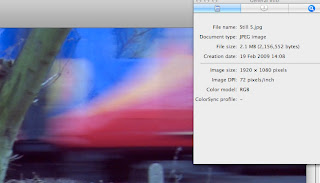
Yep, my stills read 72 DPI, despite the fact that the film was shot in HD.
Now, I'm racking my brains for a solution. I try tampering with the settings in my editing suite. I try different formats - PNG's, TIFF's, PICT's, anything! I try exporting Quicktime Stills, or anything else. I even try fiddling in Quicktime a completely different application Two whole days, I am banging my head.
The internet, normally the grapevine for such usefulness is basically hinting that I should buy an expensive photo editing suite - like hell I will!
So that is it, two day later, I am at a loss. Than in the corner of my eye, I spot a solution online:

I give it a try, and lo and behold, it works! Two frigging days for a relatively simple, if unorthodox procedure.
So, here is how you increase the DPI of your pictures so that it shows '300 dpi' instead of '72 dpi' to satisfy film festival regulations.
(If you follow the link, you will know for what operating system I am talking about, but like hell I will give those w**kers a direct plug by mentioning them in the blog).
---
1) Export the still from the editing timeline, in any 'still' format you want. I stuck to JPEG. Note that it will currently read '72 DPI' if you check the info of the file.
2) Open in Preview. Save as a PDF. Do not bother with any filters etc.
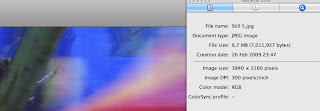
3) Open the PDF in Preview again. Save it as a JPEG. You will get the option to increase to the DPI, which is defaulted at 150 DPI. Type in 300 DPI.
4) You end up with exactly the same image, at the same dimensions, but now it satisfies the festival requirements and will read '300 DPI' when you check out the info for the file.
---
Now, I understand the festivals, why they want 300 DPI, as this is for their publicity, to make our films look good. What bugs me is that despite the multitudes you can spend on editing software, it does not do this automatically for you. I had to spend two days and follow an unrelated thread in order to find the solution to this problem.
After all, there are thousands of film makers, like myself out here in this world, who lift their stills off the editing time line and use it for their own publicity. Yet, the editing software, supposedly the 'one' that film makers use, the 'easy' option, cannot even export a JPEG to the standard dimensions demanded by film festivals.
For shame programmers - do you guys have a clue who your customers are?
As a director, there are certain things I despise. One of them is a simple solution to a seemingly complex problem.
Note the following:

This is a sample of the rules I have to follow to enter a film festival. A seemingly simple proposition. To make sure my JPEG's have a resolution of 300 DPI. So I lift a few stills directly from the timeline of my editing suite.
And now I have this problem:

Yep, my stills read 72 DPI, despite the fact that the film was shot in HD.
Now, I'm racking my brains for a solution. I try tampering with the settings in my editing suite. I try different formats - PNG's, TIFF's, PICT's, anything! I try exporting Quicktime Stills, or anything else. I even try fiddling in Quicktime a completely different application Two whole days, I am banging my head.
The internet, normally the grapevine for such usefulness is basically hinting that I should buy an expensive photo editing suite - like hell I will!
So that is it, two day later, I am at a loss. Than in the corner of my eye, I spot a solution online:

I give it a try, and lo and behold, it works! Two frigging days for a relatively simple, if unorthodox procedure.
So, here is how you increase the DPI of your pictures so that it shows '300 dpi' instead of '72 dpi' to satisfy film festival regulations.
(If you follow the link, you will know for what operating system I am talking about, but like hell I will give those w**kers a direct plug by mentioning them in the blog).
---
1) Export the still from the editing timeline, in any 'still' format you want. I stuck to JPEG. Note that it will currently read '72 DPI' if you check the info of the file.
2) Open in Preview. Save as a PDF. Do not bother with any filters etc.
3) Open the PDF in Preview again. Save it as a JPEG. You will get the option to increase to the DPI, which is defaulted at 150 DPI. Type in 300 DPI.
4) You end up with exactly the same image, at the same dimensions, but now it satisfies the festival requirements and will read '300 DPI' when you check out the info for the file.

---
Now, I understand the festivals, why they want 300 DPI, as this is for their publicity, to make our films look good. What bugs me is that despite the multitudes you can spend on editing software, it does not do this automatically for you. I had to spend two days and follow an unrelated thread in order to find the solution to this problem.
After all, there are thousands of film makers, like myself out here in this world, who lift their stills off the editing time line and use it for their own publicity. Yet, the editing software, supposedly the 'one' that film makers use, the 'easy' option, cannot even export a JPEG to the standard dimensions demanded by film festivals.
For shame programmers - do you guys have a clue who your customers are?
Thursday, 29 January 2009
The Colours Continue
Well, the 'tripping' correction is now over', so I am off to the world of subtlety and the second colour correction, an enhancement rather than a straight change of the colours within the film.
The reason I went tripping on the first colour correction was to test out all the tools available. Now, on this more subtle one, I will use correction to enhance and add a richness to the colours within the picture. So there will be no artificial additions (if the hedge is brown and leafless with bark, then it stays that way) but improvements in the true colours themselves (red seems to do particularly well when 'spiced up').
I admit to being a super geek...
The reason I went tripping on the first colour correction was to test out all the tools available. Now, on this more subtle one, I will use correction to enhance and add a richness to the colours within the picture. So there will be no artificial additions (if the hedge is brown and leafless with bark, then it stays that way) but improvements in the true colours themselves (red seems to do particularly well when 'spiced up').
I admit to being a super geek...
Wednesday, 28 January 2009
Butchering the Secondaries
(Before)

Now, I actually do not know what I am doing while I am correcting the colour for my short film. Which is why I have decided to go, for the first take, along the path of the 'butcher of brightness' and all such technicolour marvels. Luckily, being an experimental short in itself, I have taken some liberties with my first attempt at Colour Correction. By tonight I would have finished the 'butchered version' and then it will be onto the (much more difficult) subtle colour variation.
Anyway, Secondary Colour correction is much more detailed. Primaries affect the whole shot, secondaries, the part of the shot you want to affect, either a particular part, or if the shot is moving, a particular colour grain(s). It is more subtle, but distictly noticeable, especially when in HD:
After:

Anyway, enough geekery, I'm off to finish it off!

Now, I actually do not know what I am doing while I am correcting the colour for my short film. Which is why I have decided to go, for the first take, along the path of the 'butcher of brightness' and all such technicolour marvels. Luckily, being an experimental short in itself, I have taken some liberties with my first attempt at Colour Correction. By tonight I would have finished the 'butchered version' and then it will be onto the (much more difficult) subtle colour variation.
Anyway, Secondary Colour correction is much more detailed. Primaries affect the whole shot, secondaries, the part of the shot you want to affect, either a particular part, or if the shot is moving, a particular colour grain(s). It is more subtle, but distictly noticeable, especially when in HD:
After:

Anyway, enough geekery, I'm off to finish it off!
Subscribe to:
Posts (Atom)


 Posts
Posts


